Monday, November 5, 2012

Abstract Art Session

Saw this great painting on Pinterest today and I knew that I had to try it out.  Over at Craft Pond Margo gave a wonderful tutorial about making abstract art using acrylics.  I have never seen this site before but it looks great from what I have perused.

What was going to be a quick quiet time for me turned into three hours of me and the kids taking turns painting!  Good times.


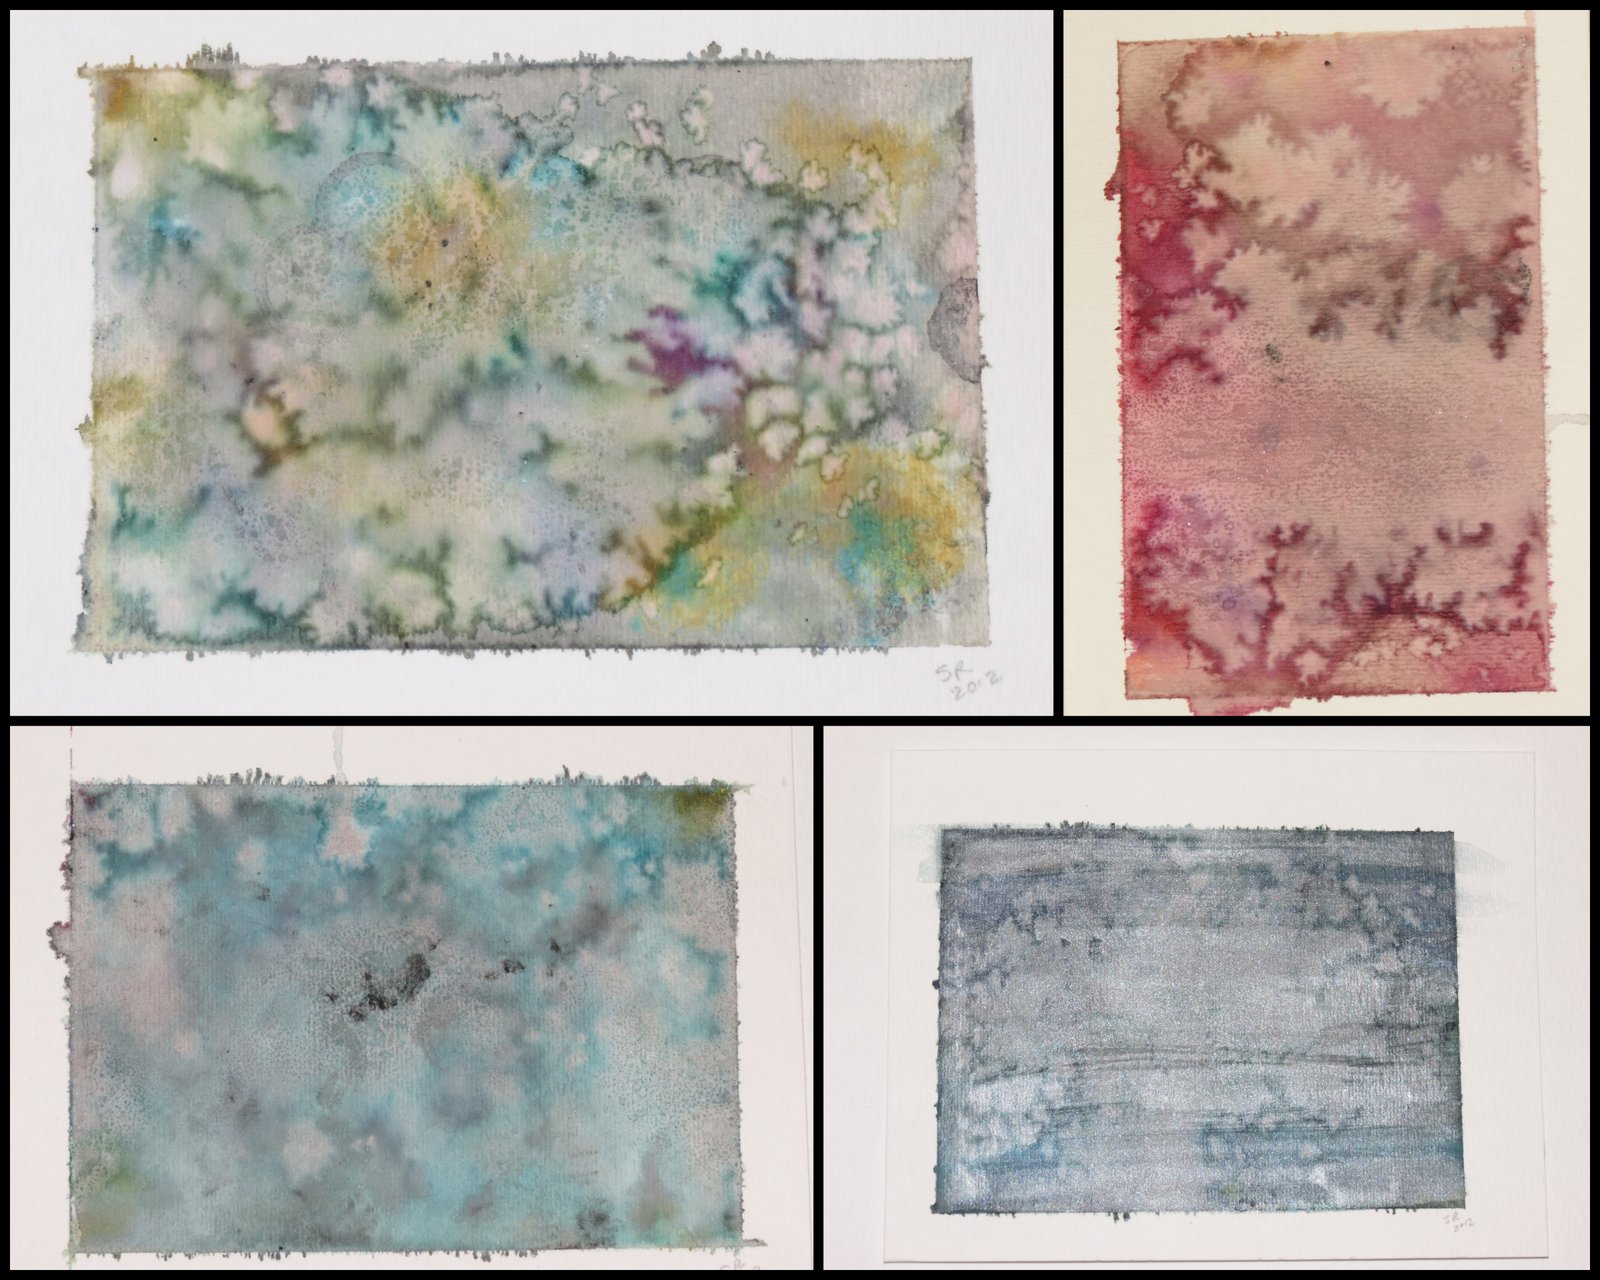
My attempts at abstract art. The bottom left was the first one I tried.  The top far right is on a did and then redid and I like how it turned out with the redo.  It reminds of a a prairie fire.
 
These are by our 6 year old son.  It was interesting to watch him and how much he blended.  He then wanted to do a sea scape with a sunset (top left.)  I think the top right one would make a great fabric print.
 

These are by our 11 year old daughter. She is the most artistically inclined so far.  The top two are her abstracts.  The way she curved her brush strokes remind me of marbled paper.  The bottom two were inspired by art we saw at an art show this weekend. 
 

These are by our 9 year old son.  He really blended the first painting to a very uniform color.  Very meticulously blending the paint blobs with same brush stroke.  In the end we had to add more blue and green to cover a blob that dried before he got to it.  It has a lot of movement inspite of the super blended color.


These are by our 4 year old.  Top left was his first painting. It reminds me of a sunset in the forest with a tree off on the right side.

Here are just a few of the the process.  It really was fun to watch how each approached this and how they turned out final products and what each considered done.


We had a great time and I think we will be doing this again.  Maybe on a larger scale next time.  These were all on small sheets. 1/2 9x12 sheets of watercolor paper and some smaller trading card sizes. 
Posted by Picasa

Wednesday, October 31, 2012

Blogger Quilt Festival Fall 2012


This was a fast fun baby quilt to make.  This was a Pinterest inspiration found and made in quick succession. Cluck Cluck Sew did an amazing tutorial on making this lovely quilt. I haven't been quilting in a long while.  Life has taken over and kids have come first.

The process was quick for me. I think I had the fabric pulled and the top pieced in two days. My house suffered but it was so nice to create with fabric again.
  Choose fabric for the circle and background.  Lay them out until you are happy with the combinations.  Sew the circles down at a 1/8"-1/4" from the raw edge.  No interfacing on this one.
Next time I make this I will sew around the circle twice just to be sure it is secure.

 
You can cut a stack of three at a time into quarters.  Yes, cut the nice circle/square block.

I don't know if it's necessary but it seems to save on bulk on the back side of the quilt an in seams.

Next, lay out the quarter blocks together until you are happy with your combinations.  I would like to have used more variety but I wanted it done and time was in short supply.  I then pinned and sewed and pressed the seams open for this quilt.  Again, I wanted to reduce the bulk of the seams. 
I had a bit of a time choosing how to sash it.  I wanted this little quilt to be bigger but not make more blocks.

I decided on a medium grey and really like how modern this one turned out.  The grey was for another project but I keep using it for other smaller ones!

I used a combination of free motion quilting on my Elna and the wavy stitch on my 717 Bernina. I don't have a walking foot for my Bernina and I have decided after doing this quilt that I must invest in one.  I really love the wavy stitch but it was hard to do without a million puckers etc. As for the free-motion quilting, I am rusty.  Ugh.  I forget how much practice it takes to make even circles and keep things smooth and not pulling.

I love the scrappy nature of this quilt and really love that I had everything to make this quilt already at home! This went to a sweet baby that just came home from the hospital after making his entrance about 10 weeks early.  He is doing great and I hope this quilt will get much love and use.


Quilt Stats:
Size: 32"x45"
Techniques: raw edge applique
Quilted by: Me on the home machines
Best Catagories: Baby Quilt, Home Quilted, Scrap Quilt
Posted by Picasa

Friday, September 28, 2012

A Day in the Life--Turning 4

This little monkey of ours is a joy and keeps us so busy sometimes it's hard to keep up. 

I have a tradition (well I try) to take a picture of the kids first thing when they wake up on their birthdays and right when they go to bed. 

 At the park we saw snapping turtles while we were feeding geese.  I've never seen them come up so close and eat! Then there was climbing to be had adn moment of quiet contemplation.  And to put an end to our park outing, he went "fishing" which turned into wading. Sigh.


Lemon cake with raspberry cream cheese frosting and lemon curd and whip cream.  Very tasty. Phone calls from cousins and grandparents and cousins.  It was  very good day. 
Posted by Picasa

Monday, September 24, 2012

First Day of School (a little late)

I was out of town for the first day of school this year.  I asked Scott if he would please take a picture of the kids.  Here they are all ready to go! The kids are now in 6th grade, 4th grade, 1st grade and two 1/2 days of preschool.  They were happy to get back to see friends and have time apart! 
The following pictures are from our school swim party.  They are a crazy bunch.
 
We have been at this school long enough that Liz is now as tall as our fabulous 1st grade teacher! How did that happen that she got so big?
 
Spencer the fearless. At almost 4 it is sometime a bit scary to watch what he will do without even blinking an eye.  Sigh.  Never a dull moment.


Ian learning to dive, well actually more bellyflopping happened but it's a start!
Posted by Picasa

Tuesday, June 26, 2012

Art for Birthday Cards

We have a lot of family birthdays in May so I had the kids make some small (4 to a sheet) watercolors that we could use as cards.  I love seeing how each interpreted the project. 

Ian age 9.  The dragon/firebird use some wax resist.
 

Spencer age 3.  We added some salt to get this effect.

Elizabeth age 11. She did a larger version of the chameleon on canvas for a 4-H project.
William age 6.  His version of a rocket on the left and a cherry tree.
Posted by Picasa

Wednesday, June 20, 2012

Adirondack Alcohol Ink Tiles

I made this tiles after seeing a post via Pinterest.  The inks weren't too expensive but I did use my coupon (Hobby Lobby) a couple of times to get more colors. You will need the blending solution too.  I used a used a toothbrush to spread the alcohol mix around before adding the ink. You can get a whole bunch more color options via this website: Ranger Ink and Innovative Craft Products

I followed this tutorial at Artsyville.  Really the comments section carries a bunch of information as well.  So though lenghty, it's worth the read.


The red and yellow one on the right, I added more alcohol blending solution to mix the colors even more.

What do I plan to do with these?  I am just going to use them as coasters.  I hot glued white felt on the back and that seemed to work just fine.

This process is fairly quick but do it in a well-ventilated area.  The blending solution is fairly strong!
The only problem is the finishing.  As you read through the tutorials you will see in the comments that finishing them so they are permenant and usable is under debate.  If any of you try this and find some good solution(s), please let me know!!


There are metallic colors available too!
 
Posted by Picasa

Saturday, March 31, 2012

Project: Simplify 2012! The Counter of Stuff.

Well.  It has taken me 2 weeks to get this together and there is still more sorting and purging to do.  I wish my counter could stay like this forever.  Alas, we live here and it will be a mess again, though maybe not so bad.

Are you ready?  Deep breath.

BEFORE:
Kitchen counter that is the catch all of everything coming in the house.

Our calendaring area.  Yeah, not so much.
Okay, now that I have shared one of the messiest places in our house you, I hope we can still be friends. Actually, what I wanted to do this week is my sewing room.  Alas it was spring break and the kiddos wanted my attention, though I did get a start on that explosion of a space. One day it may be done enough to share.

Now onto why you are here and why I did this in the first place, other than sanity.  I need to share and feel like I accomplished something!

AFTER:
I know right!? There is a huge counter here!

Oh, and look a desk and a bulletin board. and an Easter basket!
Yes there is still a junk box on the top shelf. All those little bits and pieces that I just might need at some point.  But the drawers that were holding the kids school  paper is now holding the batteries, tape and small tools that we use frequently. The green basket holds markers and other art supplies.
Now the details:  I am still left with this huge pile to sort!!!! Argh.  I am working through it today and tomorrow.  So far and have a smallish garbage bag and a 1/2 full banker box to recycle.  So many miscellaneous bits and pieces that have no particular home.  Sigh.

THE PILE of STUFF remaining!

But wait there is more I want to share.
I took all the kids files of school stuff and bought clear hanging file boxes. My goal is to have one box for each child for their whole 12/13 years of school.  A file for each year of school and then a Pre-K file for everything before Kindergarten.

This is my 11 yo daughter's box.  I am going to need to go through all of their papers again.  In my dream world I would have a large flatbed scanner to scan everything in and save a lot of it that way.

The blue bin is all of my Box Tops for Education papers.  It will be gone and handed off in May! The clear tote is all the current school year papers and the orange sliver on the left is the new birthday card file folder.  I have cards for each month and I am hoping this helps me get them sent on time!

Four kids school boxes filled and labeled! And now moved to the basement.

For some reason a few years back I stopped throwing used batteries in the trash.  Well they are overflowing their shoe box waiting for recycling at the battery store.  They are now in a bag in the car to drop off on Monday!

The writing drawer.  Semi organized chaos.

Much better.
This feels great to have all of this cleaned up.  Now to keep it this way for more than the weekend.  I have other areas that have to be cleaned and purged before some items can be put away.  I need the mantra: "A place for everything and everything in its place" posted somewhere prominently in the house!!

Thank you Tsh for hosting again and getting us all excited about simplifying our lives.